<< Back to the Guide Listing A "room" for the purposes of this guide is any single piece of a dungeon.
Beginning your plan[]
As you plan your dungeon be mindful of the overall aesthetic of the dungeon you are designing.
The individual dungeon pieces should look like they belong with all of the other pieces once the full dungeon is assembled. They should also look like they fit within the Trove world in general. Tying the dungeon to a biome is an easy way to ensure this connection to Trove. For example, a dungeon made entirely out of "rare bear" walls and torch floors will not be accepted.
The Style Guidelines will significantly help with this part of the planning process. You should pay special attention to the section on Colors and shading.
Room assembly[]
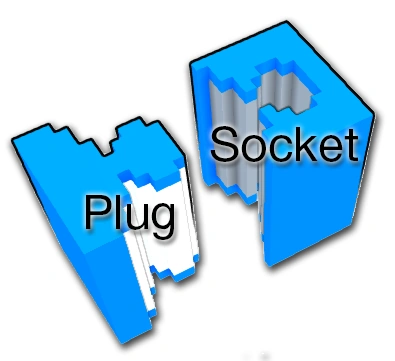
Plug and Socket
Your dungeon's rooms are connected using a series of plugs and sockets.
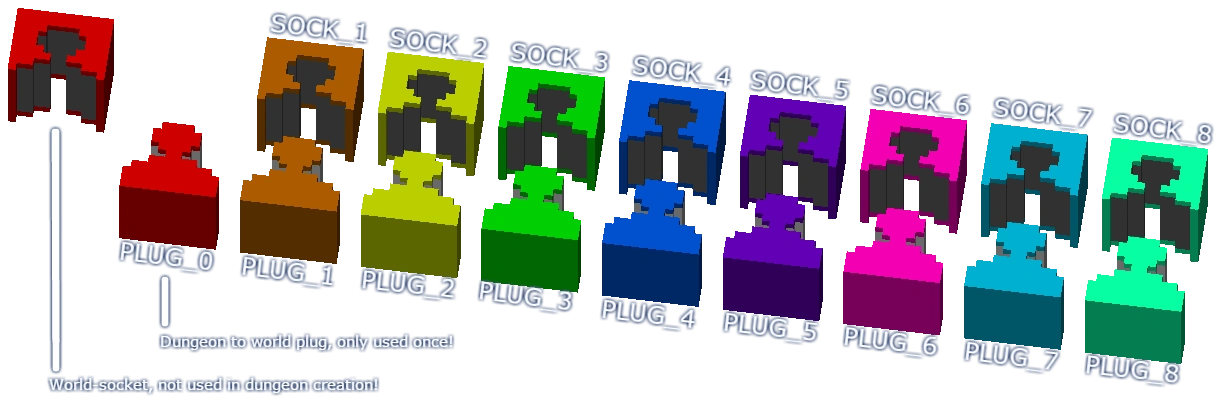
- There are 9 different colors for the plug and socket sets. Note that the red plug is reserved for the dungeon plugging into the "world socket". Therefore only one room in your dungeon may have a red plug. The red socket is not used in dungeon construction. Beyond that restriction blue plugs fit into blue sockets, green plugs into green sockets, and so on.
- Each room must have one, and only one, plug. Additionally the room may have as many sockets as are needed. Keep in mind that all sockets must be filled, for a given room, for the dungeon to successfully assemble.
- Rooms with one plug and no sockets are typically called "endcaps". An endcap can even be a room where the only item in it is the plug. The dungeon will not build properly (it will give an error in the log file) if every color socket used in the layout doesn't have a corresponding plug.
- The dungeon will keep plugging rooms into sockets until one of the following conditions are met
- a) no more rooms will fit inside the "dungeon area"
- b) the number of allotted rooms reaches 0 (more on this in the .dungeon file section).
Planning the layout of your dungeon[]
Graph paper and/or a voxel editing program are useful when planning a complex layout.
"Dungeon Area" constraints[]
Common Definitions[]
- "Open" - is defined as being free of spikes, lava and other "deadly" floor elements as well as any other obstacles
- "Ground level" - is defined as the vertical position of the red plug within the Dungeon or lair
- "Dungeon Area" - refers to the amount of space that is available to create the dungeon within (125x125x125).
Common Rules[]
- Construction - All exterior space should be completely filled on the vertical, or Y, axis. This is because anything between two blocks is converted to air, only interior spaces should have empty space between two blocks. Note: if your design plan doesn't allow for this you may use fake air blocks to provide the floor and/or ceiling for your dungeon/lair.
- Doorways - You must have no "doorways" less than two voxels wide. Additionally, doorways should not be more than three voxels thick.
- Openness - Hallways and stairwells should be no less than three voxels wide. Additionally all areas where the player will maneuver must be at least two voxels high. Three voxels of height is preferred.
- Gameplay Areas - Gameplay areas are rooms, or corridors, which feature monsters and/or traps which must be navigated to progress. These areas should be no less than four voxels wide and should be a mostly "open". See the definition for "open" above in the Common Definitions.
- Variation - Each room should have at least two possible layouts. Varying decorations are optional and cannot be the only way your rooms are different.
- Integration - Your dungeon/lair should feel as though it belongs in one of Trove's biomes. For more information about the biomes look at the Biome Concepts and Biome Colors.
- Quests - Major quests are signified by a boss quest placeholder and minor quests are signified by a normal quest placeholder. Lairs only contain one "minor" quest and they contain no "major" quests. Important: There should be few monster spawns in the quest areas. Additionally, the quest areas must be at least 70% "open". See the definition for "open" above in the Common Definitions.
- Common Quest Rooms - Lair quest rooms must be 30 voxels wide and 30 voxels long, or larger. This rule applies to both the minor quests (aka "Lair quests") in Dungeons as well as the quest room for lairs.
Lair[]
- The entrance to a dungeon or lair must be obvious. Portal entrances are acceptable, but they must be clear and visible from most approach directions.
- There should be one to two gameplay areas before reaching the "major" quest area.
- The Lair should be able to kill the player, but not require bombs to navigate successfully. An example of a good room would be one with a spike trap "puzzle".
- Up to 39 voxels wide and 39 voxels long where the red plug is in the center of this area.
- The lowest point may be up to 30 voxels below "ground level", but MUST NOT be less than 3 voxels below ground level.
- Up to 60 voxels above, and including, "ground level".
- There must be one, and only one, "major" quest area in every variation of the lair. See the "Quests" and "Common Quest Area" rules above for more details on what the quest area should be like.
- There is a maximum of 20 active traps for the entire lair. Currently both line and flame turrets are included. There may be additional inclusions in the future.
- Keep in mind that up to five monster spawns may occur per Lair, but not more. You may place more spawn points, but the 5 points that are used will be chosen at random from all possibilities.
- There must be a "quest completion" triggered portal at the entrance and in the "major" quest room to allow the player to quickly return to the entrance after completing the major quest.
- Radiant Ruins lairs have a few guidelines:
- Radiant lairs only spawn Dark Heart quests, so they must have 85-100 Dark Heart Spawn locations (these create the Radiant Shards) and NO monster spawns.
- When placing the Dark Heart Spawns, consider distributed platforms with clusters of 2-5 shards, as well as bigger groups of shards in areas that take a few more seconds to reach.
- Should be a fairly vertical structure that requires interesting but NOT TOO ANNOYING utilization of air vents and jumping.
- All .dungeon files used for lairs MUST begin with the following:
[Dungeon]

Type = Lair
Dungeon[]
- Up to 125 voxels wide and 125 voxels long where the red plug is in the center of this area.
- Up to 125 voxels in total height. The lowest point of the dungeon must be AT LEAST 10 voxels below ground level and NO MORE than 50 voxels below ground level.
- Must contain one, and only one, "major" quest as well as two "minor" quests (aka "Lair quests"). See the "common" rules for the "minor" quest areas above after the "Quests" and "Common Quest Area" headings.
- The "major" quest
- There should be one to two gameplay areas before reaching the "minor" quest areas. Important: Note that both "minor" quest areas must occur prior to reaching the "major" quest area.
- There should be two to three gameplay areas before reaching the "major" quest area after the last "minor" quest area.
- The "major" quest area must be at least 29 voxels wide by 29 voxels long. The path to this area must be as obvious as possible. Ideally it could be seen while approaching it from any part of the dungeon. Also, the area should be clearly identifiable from any other dungeon space and there should only be one boss quest area. This area should be at least 70% open. See the definition for "open" in the common definitions above. There are additional "common" restrictions listed above after the "Quests" heading.
- There is a maximum of 10 "active" traps per room. For the purposes of this rule, a room shall be comprised a rectangle the size of 1/4 of the total dungeon width and length. (Currently both line and flame turrets are included. There may be additional inclusions in the future)
- Up to 25 monster spawns will occur per Dungeon. You may place more spawn points, but the 25 points that are used will be chosen at random from all possibilities.
- Upcoming feature - There will be small mini-treasures to find in the future. Think about adding 2-4 extra little rooms for these to spawn.
- There must be a "quest completion" triggered portal at the entrance and in the "major" quest room to allow the player to quickly return to the entrance once the major quest is completed.
- The dungeon should focus on feeling more "grand", or "epic", than a lair rather than having a large number of gameplay areas.
- The dungeon's build process doesn't take into account the volume of rooms. It only determines whether the rooms, attached through plugs and sockets, can be assembled within the "dungeon area", so it is possible for rooms to intersect other rooms if your layout doesn't take the room's size and shape into consideration.
Shadow Dungeon[]
- Same total dimensions as a normal dungeon, with relaxed restrictions on height (shadow dungeons don't spawn on varied terrain – they are always in a flat Sea of Regret that's always at the same height)
- Must use one of the acceptable shadow dungeon color palettes (see below)
- Must have an enclosed staging area centered over the dungeon. Staging area requirements are…
- Must be divided into two areas, a spawn-in area and a completion area.
- Spawn-in area must surround the spawn-in location: (0, 62, 0) in the metaforge. Another way to think of this is that the spawn-in area must surround the location 62 blocks directly above the red plug, whether in the same blueprint or connected by a plug/socket.
- Spawn-in area must contain a normal (red platform) portal connection to the beginning of the dungeon
- Completion area must contain a boss portal connection to the boss room
- Completion area must contain the following services:
- Class Changer (/wadd placeable/classchanger)
- Rejuvenation Station (/wadd placeable/refiller_healthflask)
- Trading Post (/wadd placeable/tradingpost)
- Deconstructor (/wadd placeable/crafting/deconstructor)
- Personal Chest (/wadd placeable/chest_personal_basic)
- Shadow market (/wadd placeable/vendor/shadowshard_01)
- Shadow Tower Portal (/wadd placeable/portal/arena_shadow_tower_next)
- Layout must be essentially linear, and pacing must be as follows:
- 3 encounter areas --> regular quest --> barricade blocks preventing entrance to boss --> boss area w/ boss quest
- The first encounter area must begin with a normal (red platform) portal
- Barricade blocks must be located in the same blueprint as the regular quest (or they will not despawn)
- Must have at minimum 10 NPCs (more are preferred)
- Trap placement and environmental hazards should be aggressive and challenge the player. However…
- No single-wide paths through spike fields or other very “fiddly” obstacles
- Encounter areas should have a reasonable amount of space to fight enemies
- Shadow dungeon color palettes:
Shadow[]
| (R, G, B) | # | Color |
|---|---|---|
| 22, 20, 23 | #161417 | |
| 52, 54, 61 | #34363D | |
| 41, 36, 46 | #29242E | |
| 145, 156, 164 | #919CA4 | |
| 168, 176, 176 | #A8B0B0 | |
| 110, 29, 231 | #6E1DE7 | |
| 82, 185, 233 | #52B9E9 |
Permafrost[]
| (R, G, B) | # | Color |
|---|---|---|
| 43, 72, 115 | #2B4873 | |
| 160, 184, 219 | #A0B8DB | |
| 180, 201, 232 | #B4C9E8 | |
| 69, 137, 169 | #4589A9 | |
| 119, 188, 241 | #77BCF1 | |
| 82, 185, 233 | #52B9E9 |
Desert Frontier[]
| (R, G, B) | # | Color |
|---|---|---|
| 43, 17, 17 | #2B1111 | |
| 77, 46, 33 | #4D2E21 | |
| 140, 81, 42 | #8C512A | |
| 59, 34, 31 | #3B221F | |
| 169, 14, 11 | #A90E0B | |
| 82, 185, 233 | #52B9E9 |
Candoria[]
| (R, G, B) | # | Color |
|---|---|---|
| 240, 138, 255 | #F08AFF | |
| 246, 191, 254 | #F6BFFE | |
| 39, 31, 18 | #271F12 | |
| 73, 58, 33 | #493A21 | |
| 177, 132, 55 | #B18437 | |
| 82, 185, 233 | #52B9E9 |
A sample dungeon[]
All the pieces, the .blueprints and the .dungeon file, for our sample dungeon can be found in the Dungeon Guide .
Our example is a square dungeon with interlocking floor plans to keep things simple. This layout makes sure that no rooms intersect any other rooms. More advanced dungeon designs may be able to take advantage of intersecting rooms.
Below, we have a series of rooms (Fig. 01) and a generic cross hallway layout (Fig. 02).

Fig. 01 - Example Room Types
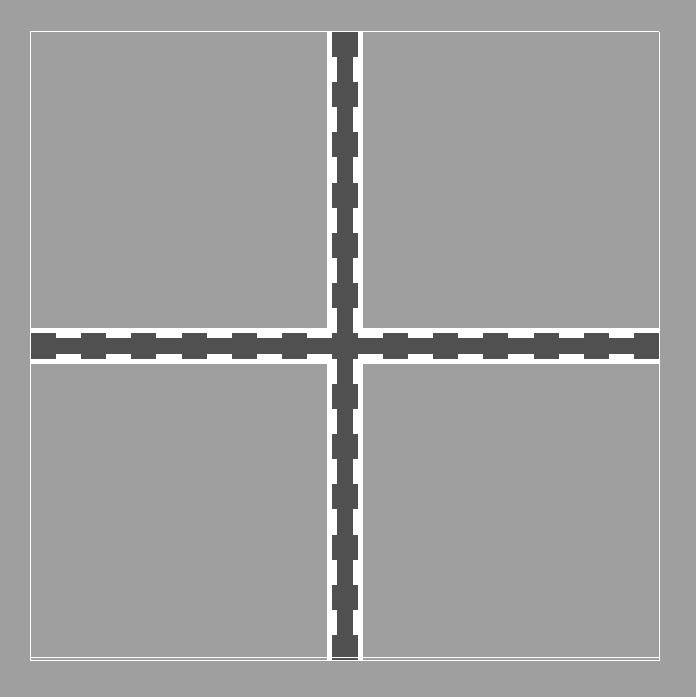

Fig. 02 - Example Hallway Layout
To make the dungeon feel more random we can eventually make many variations of these rooms. As long as all rooms which are using the same color plugs are the same shape, the rooms won’t intersect with each other. Keep in mind that as your layout becomes more complex it is also becoming more difficult to navigate. If you are able to make a directed path through the dungeon, that is ideal. Also be aware that all sockets that are attached to a room must be filled during assembly. This requirement is why the "endcap" pieces are necessary as mentioned in an earlier section.
In our example, we have a few floors which use these shapes in different layouts. When planning your layout it helps to mark exactly where the plugs and sockets are in each piece to assist in making sure it all fits together properly, see (Fig. 03).
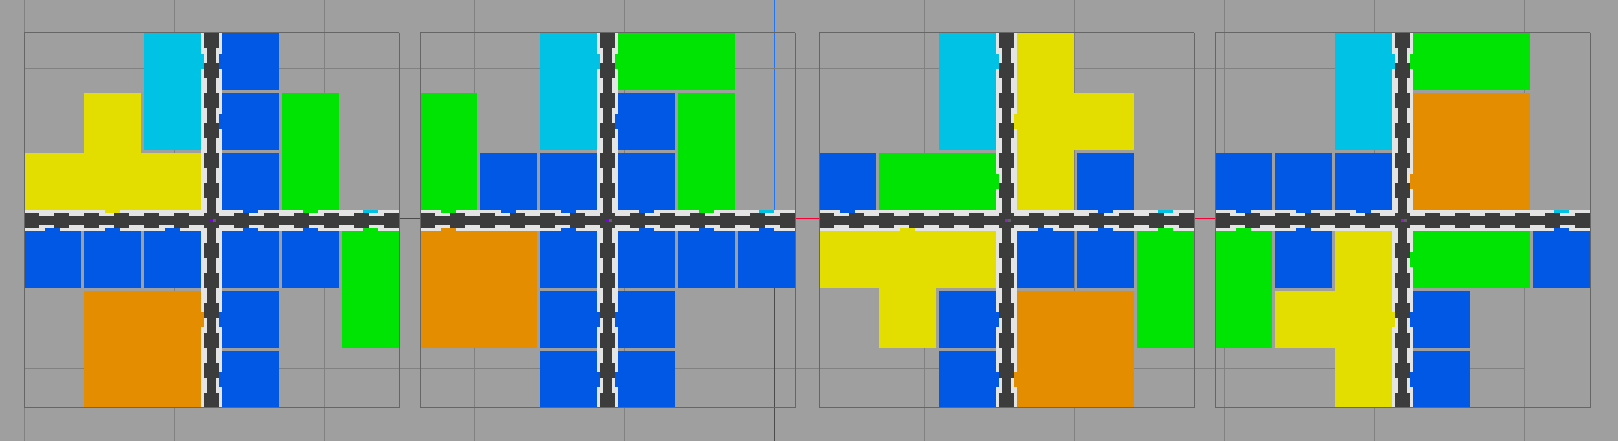

Fig. 03 - Example floor layouts
After planning is complete you’ll want to go into the Metaforge and start testing the assembly of these pieces.
Entering the Metaforge[]
To enter the Metaforge you must first enter Trove, once you are in your hub world type /metaforge (or /mf). This will cause you to load into the Metaforge. In the Metaforge you can enter flight mode as well as placing, or removing, many different block types. You can use /wadd to give yourself any .prefab file in the <GameInstall>i \prefabs folder and its subfolders. Check out the placeable_block prefabs for all the current block color options.
If you have created .qb files of your dungeon pieces, you should drag them onto the devtool_convert_to_blueprint.bat (in the <GameInstall>i folder) to convert them to .blueprint files. Once you have the blueprint files you may either drag and drop a blueprint onto the Trove window or use the /load command, followed by the path to the file, to load a blueprint into the Metaforge. devtool_convert_to_blueprint.bat saves the blueprints to the <GameInstall>i \blueprints folder as well as as copy at the location of your source .qb file. Note that you may only load one blueprint into the Metaforge at a time. Loading a second blueprint removes the first one from the Metaforge.
Once your blueprint is loaded you should add the appropriate plug, sockets, decorations, etc. Once the first blueprint is completed repeat the process for each of your .blueprint pieces.
The final step in the Metaforge is to add the GM NPC, GM Quest, GM Boss Quest blocks. These blocks will already be in your inventory and they inform the layout process of all the possible locations for NPCs, quests, and boss quests. The actual population and number of quests are determined when the dungeons appear in the world, so we can’t preview a populated dungeon in the Metaforge. If your dungeon is missing these blocks, it will be completely devoid of monsters and quests. Therefore it is critical that you add them. Generally, three to four NPCs and one Quest and/or Boss Quest per large room is a good goal. Be sure to have some Quest blocks spread throughout to make the dungeon interesting. You should design the boss room(s) so that they are easily identifiable by the player.
You should now have the knowledge you need to complete all of the blueprint files for your dungeon.
i To find your <GameInstall> folder, open Glyph, click Settings, and then click Trove in the menu on the left. The install folder will be listed in the "Install folder" field.
Creating the .dungeon File[]
Once all the pieces are ready to assemble, a .dungeon file needs to be created to describe in what way rooms can be used to create the dungeon.
There are several components to the dungeon file entires (Fig. 04)
- [Piece#] – An unique name for the piece
- Blueprint – The name of the peice's .blueprint file
- Quantity – The total number of times this piece can be used in the dungeon layout
- Weight – An optional value to change how often the piece shows up in the layout. The default value is one. A value of 0 means that the piece will only be used if no other piece fits.
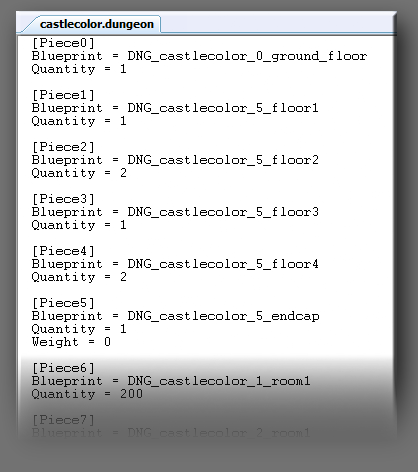

Fig. 04 - Example castlecolor.dungeon file
Make sure that your .dungeon file and .blueprint files are in the same folder. It shouldn’t matter where that folder is.
You can drag the .dungeon file into the Metaforge in order to preview your assembled dungeon. Note that you will likely need to fly up to the top of the dirt foundation it creates in order to see your dungeon. Dragging a .dungeon file into the client may return errors in the chat window if it fails to build a valid dungeon.
Some common causes for failure are:
- The red plug isn't present on any piece
- The assembled dungeon is too large to fit inside the 125 wide x 125 long x 125 hight, or 39 wide x 39 long x 90 high in the case of a lair, "dungeon area". Remember that the location of the dungeon's red plug is at the center of the width and length.
- You do not have enough plug pieces to fill all the sockets in your dungeon. Try making sure you have "'endcaps" for each color you used.
Advanced Topics – Performance Optimization and Special Blocks[]
To help ensure that all dungeons run well, and therefore play well, there is a performance number in the upper-left corner while in the Metaforge. Not only does the number go up, but there's also a color indicator to allow you to easily assess it's status. If it's reliably red in a part of a dungeon then the dungeon will not be accepted.
In addition to performance metrics, there are some special blocks. One special block family is dynamic blocks. If a block is dynamic it means that it has some type of gameplay function. If you want to upgrade dungeons that have already been accepted to include dynamic blocks, feel free to do so!
Traps:
- Spikes - If a player lands on spikes it's going to hurt.
- Shooting Blocks (red and blue) - Shooting blocks shoot! They have a single facing and will shoot in that direction. In addition all red blocks shoot at the same time and all blue blocks shoot at the same time, so you can sync up that shooting.
- Flame Turrets (red, blue and yellow) - Similar to shooting blocks, flame turrets activation timing varies based on color and is in sync per color.
- Lobber - This trap throws fireballs at you (like the volcanic crabs and muffin makers)
- Dropper - This trap drops a weight on you, causing significant damage
Mechanical:
- Horizontal Jump Blocks - Step on this block and it will send you slightly upward, and forward, in the direction it's facing. This one is just for fun and won't (actively) kill the player.
- Vertical Jump Blocks - This block launches you upward.
- Standard Teleport - these are randomly linked from source to destination.
- Quest Teleport - the entry point for these should be placed in the major quest area and the exit point should be placed at the entrance of the dungeon.
MIscellaneous:
- Fake air block - This block will allow you to simulate a "closed off" area for the purposes of the dungeon's generation, but will still allow the player to pass through it.
- Blockers - These blocks aid in preventing "overlapping" during dungeon assembly. If any two blockers intersect during assembly the most recently placed overlapping piece will be removed and other compatible pieces will be checked. There is both a small blocker and a large blocker. They both function the same way, the only difference is the size of the area that is "blocked"
Tips and tricks[]
Block replacement:[]
Target a block and, after equipping a different block, enter /floodfill into the chat window and it will replace all connected blocks of the replaced type with the one of you have equipped (like the paint bucket in Paint)
Exporting/Re-importing to Qubicle[]
Once you've added dungeon blocks while in the Metaforge, there is a way to still edit the dungeon in Qubicle and re-import it into the metaforge.
- First, deconstruct the blueprint file by dragging it onto devtool_dungeon_blueprint_to_QB.bat . This will split the blueprint into a .qb file with its associated type/specular/alpha maps, and will also create a special blueprintname_entities.blueprint file, which contains information about nonauthorable blocks (dungeon blocks, spikes, etc.) that are only editable in the metaforge. These files are located in the qbexport subdirectory.
- Next, edit the maps in qubicle. Notice that in the base map and type map, there are now bright cyan blocks (RGB 0,255,255) where the non-authorable blocks are located. Leave these blocks alone - when you re-import the .qb file, these blocks will be overwritten by the non-authorable blocks.
- Finally, convert the .qb file back into a .blueprint by using devtool_dungeon_QB_to_blueprint.bat . This combines all the .qb maps, as well as the special _entities.blueprint map, into a single blueprint that can be loaded into the metaforge.
Replicating biome shading[]
The below colors can be used in a type map to make use of a biome's automatic shading rules (how the colors automatically differ slightly from the main color). If you aren't familiar with type maps see the Material Map guide
-Peaceful Hills-[]
| Element | (R, G, B) | # | Color |
|---|---|---|---|
| Grass | 0, 200, 0 | #00C800 | |
| Dirt | 150, 100, 50 | #966432 | |
| Stone | 90, 90, 100 | #5A5A64 |
-Medieval Highlands-[]
| Element | (R, G, B) | # | Color |
|---|---|---|---|
| Grass | 0, 201, 0 | #00C900 | |
| Dirt | 151, 100, 50 | #976432 | |
| Stone | 90, 90, 101 | #5A5A65 |
-Undead Hills-[]
| Element | (R, G, B) | # | Color |
|---|---|---|---|
| Grass | 0, 202, 0 | #00CA00 | |
| Dirt | 152, 100, 50 | #986432 | |
| Stone | 90, 90, 102 | #5A5A66 |
-Desert Frontier-[]
| Element | (R, G, B) | # | Color |
|---|---|---|---|
| Grass | 0, 203, 0 | #00CB00 | |
| Dirt | 153, 100, 50 | #996432 | |
| Stone | 90, 90, 103 | #5A5A67 |
-Fae Wilds-[]
| Element | (R, G, B) | # | Color |
|---|---|---|---|
| Grass | 0, 204, 0 | #00CC00 | |
| Dirt | 154, 100, 50 | #9A6432 | |
| Stone | 90, 90, 104 | #5A5A68 |
-Dragonfire Peaks-[]
| Element | (R, G, B) | # | Color |
|---|---|---|---|
| Grass | 0, 205, 0 | #00CD00 | |
| Dirt | 155, 100, 50 | #9B6432 | |
| Stone | 90, 90, 105 | #5A5A69 |
-Permafrost-[]
| Element | (R, G, B) | # | Color |
|---|---|---|---|
| Grass | 0, 206, 0 | #00CE00 | |
| Dirt | 156, 100, 50 | #9C6432 | |
| Stone | 90, 90, 106 | #5A5A6A |
-Neon City-[]
| Element | (R, G, B) | # | Color |
|---|---|---|---|
| The Neon City doesn't use grass.
Instead it's a single color with the metal specular effect applied. The color is specified here. |
(34, 34, 41) | #222229 | |
| Dirt | 157, 100, 50 | #9D6432 | |
| Stone | 90, 90, 107 | #5A5A6B |
-Candoria-[]
This information is not yet available officially, but it is presumed that it will match what is below.
| Element | (R, G, B) | # | Color |
|---|---|---|---|
| Grass | (0, 208, 0) | #00D000 | |
| Dirt | 158, 100, 50 | #9E6432 | |
| Stone | 90, 90, 108 | #5A5A6C |
Submitting your Dungeon or Lair[]
See the guidelines in this wiki article
Rewards[]
Lair[]
- 15,000 Credits
- 3 Golden Chaos Chests
- Special hats: Dungeon Master and Construction hat
Dungeon[]
- 30,000 Credits
- 5 Golden Chaos Chests
- Special hats: Dungeon Master and Construction hat
- Your character name (in-game handle), and a personal message on a plaque placed somewhere in the dungeon (this system is still being worked on)
Shadow Dungeon[]
- 30,000 Supporter Credits (always 1.5x Dungeon reward)
- 5 Golden Chaos Chests
- Special hats: Dungeon Master and Construction hat
- *Rewards are taken based on the new system in a forum thread HERE.
Important legal stuff[]
Content you create and submit to Trion's Trove™ is governed by Section 5 of Trion’s Terms of Use .
By submitting any such content, you are agreeing to those terms, which include:
- All rights regarding the submitted content belong to Trion Worlds.
- The submitted content does not infringe upon any third party rights.
Questions?[]
For further instructions about submitting dungeons for review, please refer to the Trove Creations subreddit: http://www.reddit.com/r/TroveCreations/
Recent changes[]
- 2014/06/20 (IMPORTANT)
- Dungeon size decreased from 128 to 125
- Moved the lair quest area's guidelines to the shared guidelines as it now applies to Dungeon's "minor" quest areas as well.
- Added a note regarding the definition for "major" and "minor" quests.
- Added a "major" quest area guideline for dungeons
- Added a note about the maximum number of monsters per dungeon. As part of this many uses of NPC were replaced with "monsters" for clarity
- Clarified the "approach" information to be "gameplay areas"
- Added an important note regarding the overall area of a Dungeon, as compared to a Lair, at the end of the Dungeon area definitions.
- 2014/07/13
- Cleaned up some wording and moved some newly implemented blocks from the planned section to the main section
- 2014/08/?? (IMPORTANT)
- Changed dungeon maximum depth from 0 to be 50 voxels.
- 2014/09/07
- Added a note about the new /floodfill command
Resources[]
Links[]
Visual Guides[]
-Official-[]

Into the Metaforge Building Dungeons and Lairs
-Fan-made-[]

Trove - Quick dungeon tutorial

Trove - Quick dungeon tutorial (Addendum)